Automation Tools In AnyHow
AnyHow has a range of tasks that can be automated to help save you time and money. Everyone hates doing the same tedious tasks over and over again. Now with the help of AnyHow, hopefully you have fewer tasks to do.
In AnyHow there are the following type of automated tasks that can be configured:
- Project Status Reports
- Project Invoicing
- Project Timelog Delivery
- Post Comment
Go get to the automation screen and add a new task, follow these steps.
- Click into the manage section.
- On the left menu find "Tools"
- Click "Automation" in the tools section
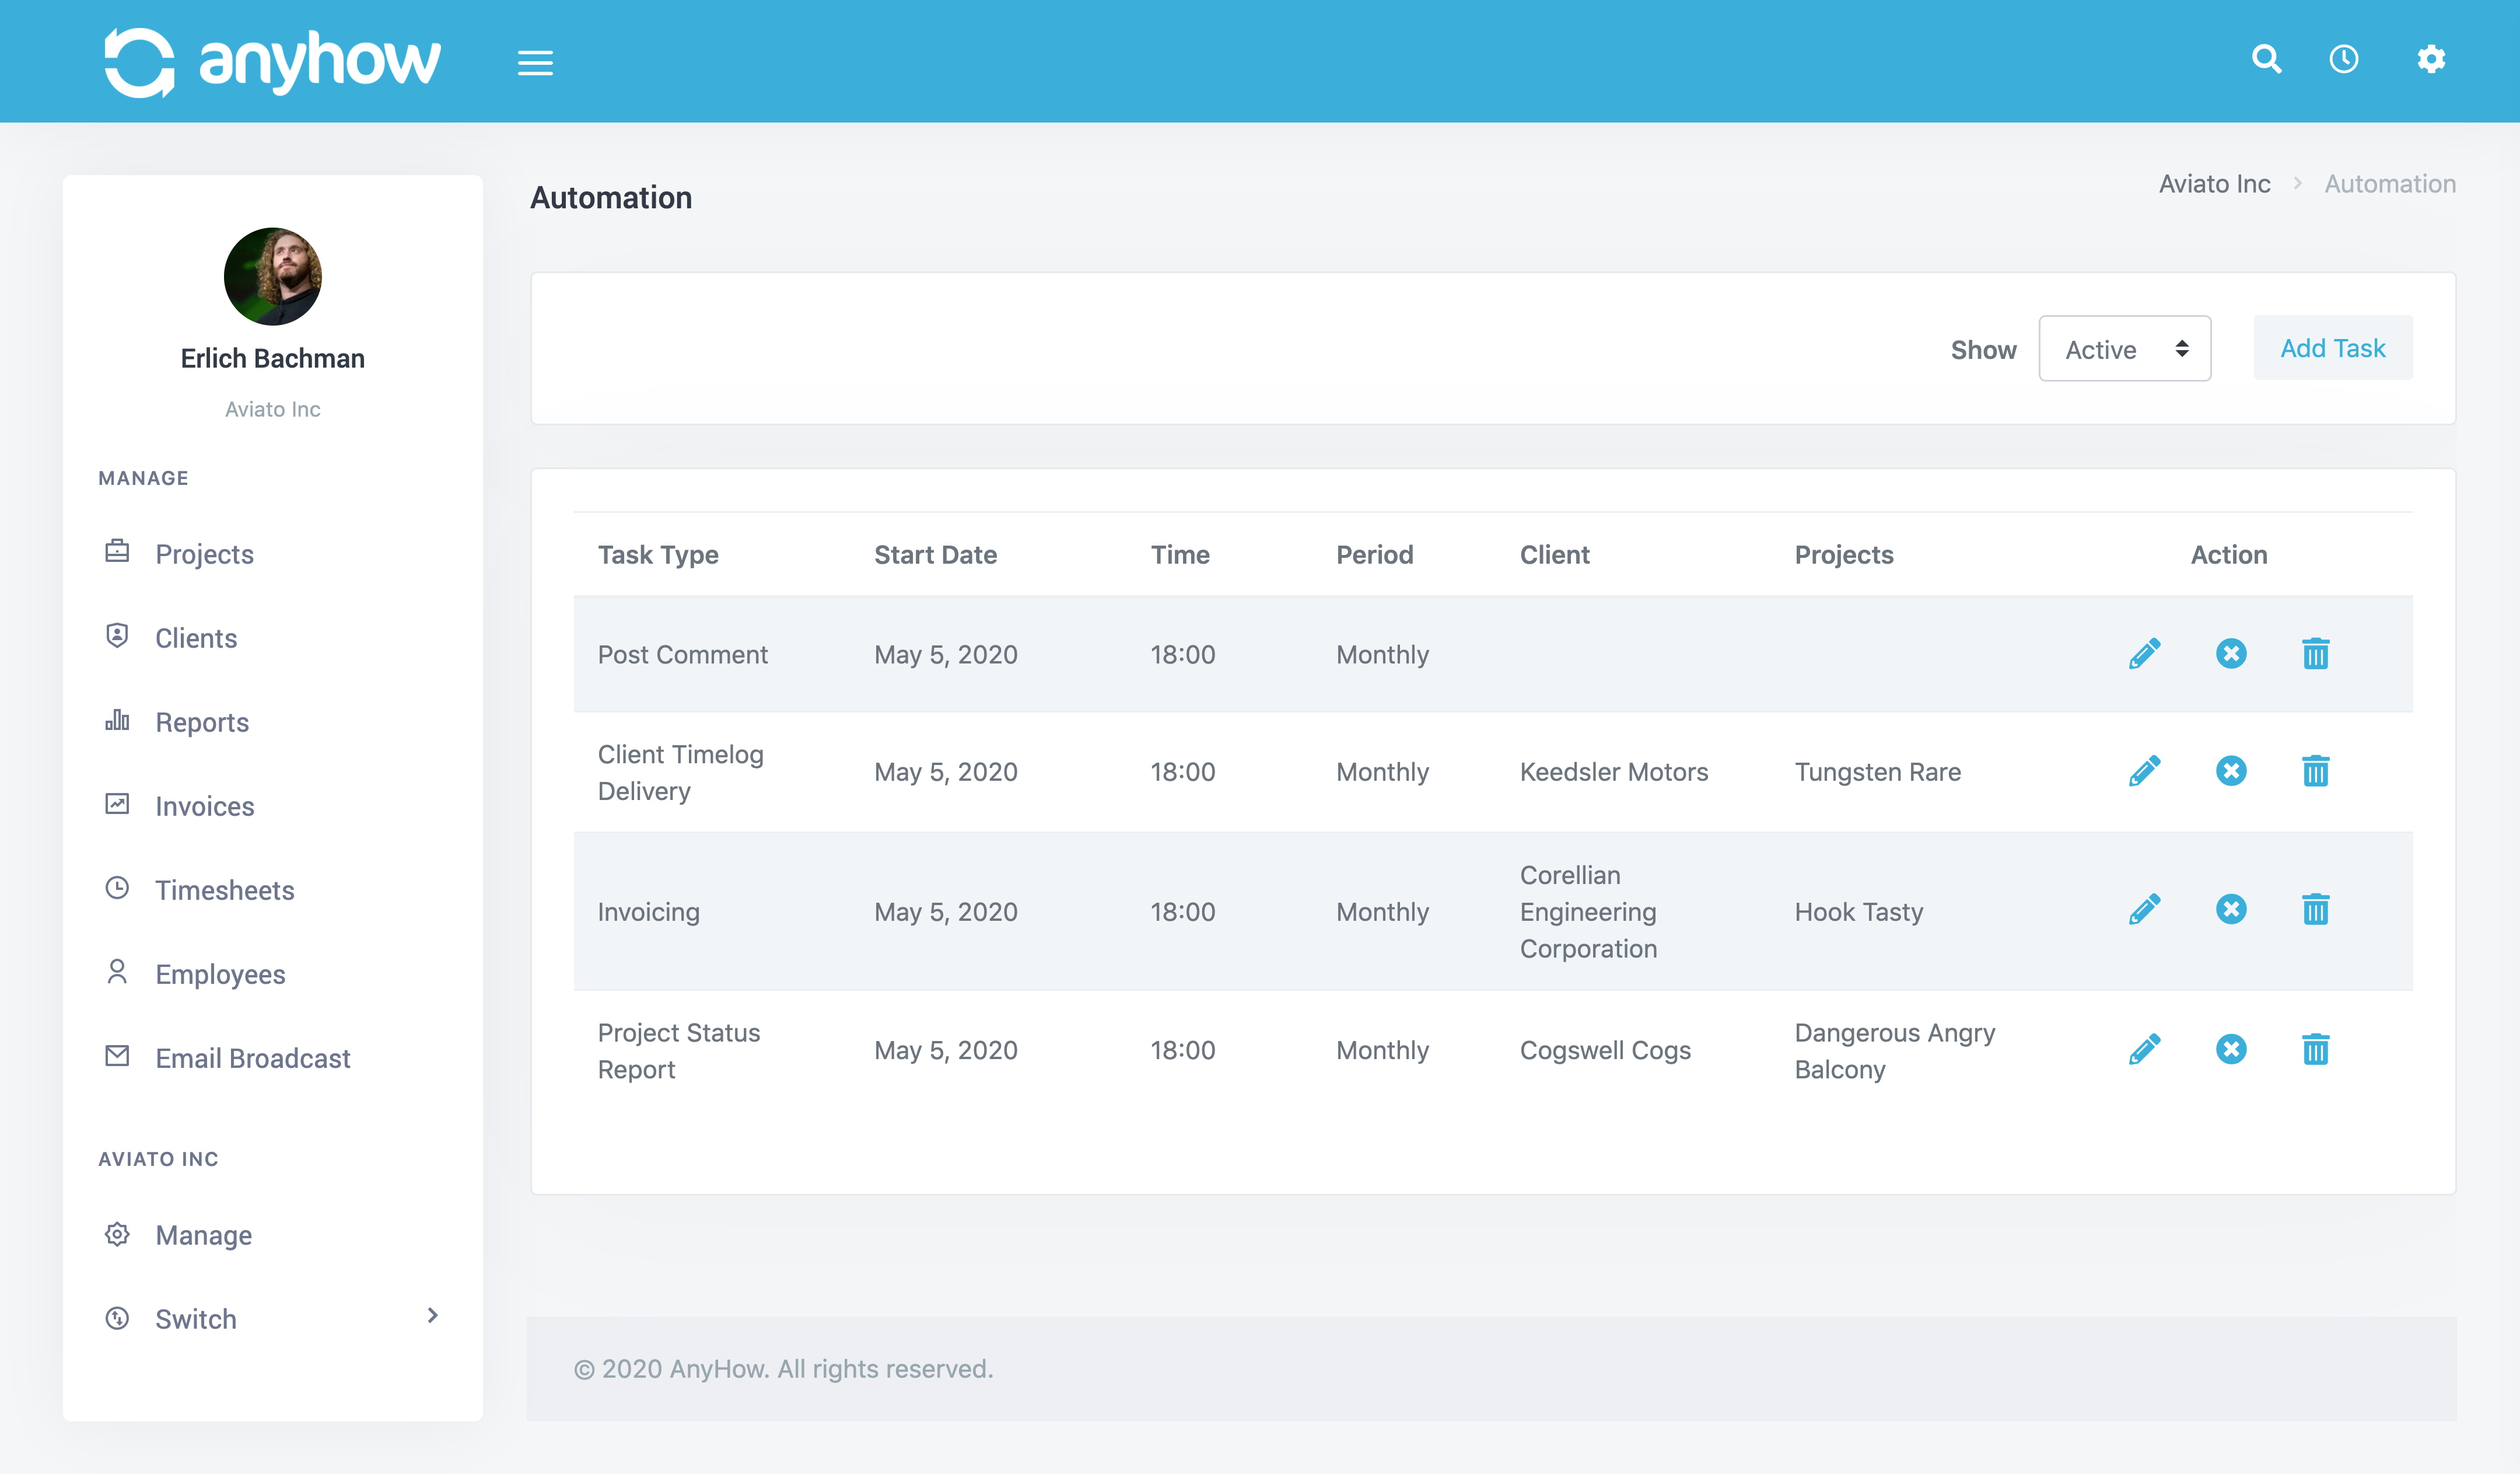
Here you will have a listing of any tasks you already have configured. You can filter by Active or Inactive tasks.
To add a new task, simply click the Add Task button. You will be given the 3 options referenced above.
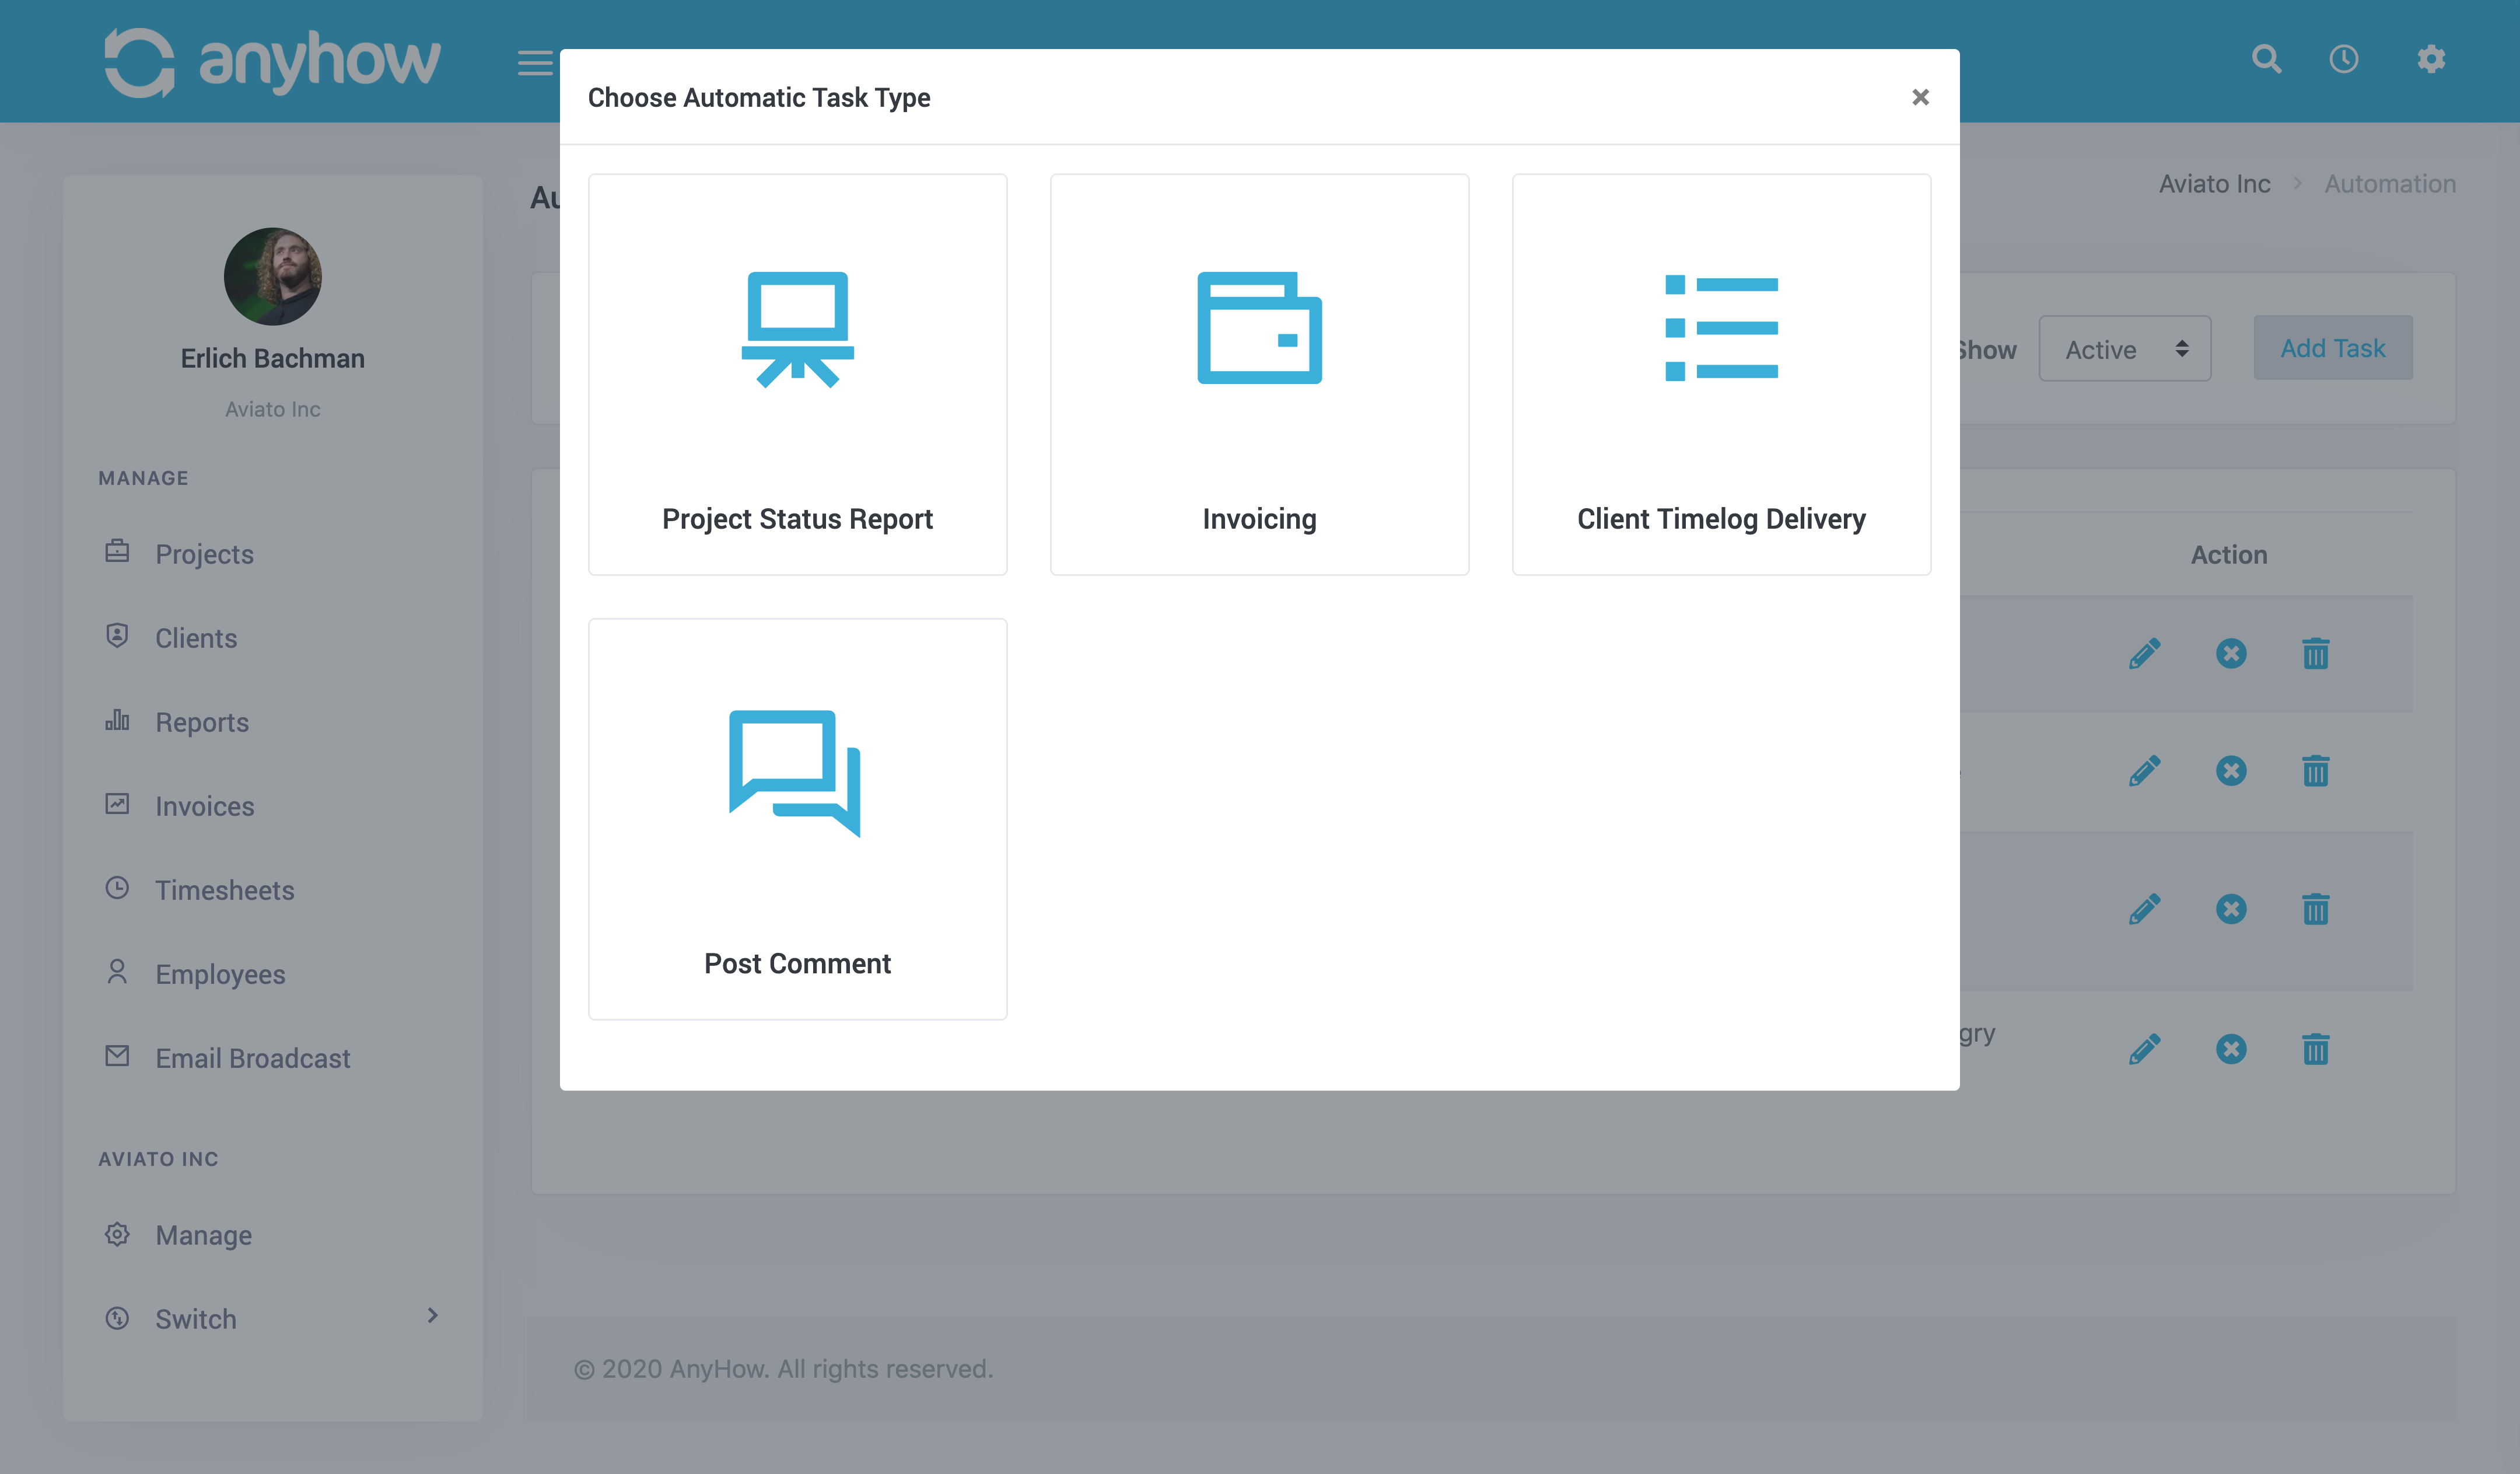
Now we will describe what the 3 tasks are and how to set each one up. Let's get started.
Project Status Report
The Project Status Report (aka, "Burn" Report) is a file that is delivered, via email, to the selected clients. The email contains a CSV file with a detailed report on the current status of each of the client projects selected. It includes budgeted costs and hours, change order values, and used (aka, "burned") time. It's very useful for clients to have insight into their project's status, financial standing, etc.
When creating a new task you need to complete a form with the required details. Here is what's on the form:
- Start Date - When is the first time this task should run.
- Time - What time should this task run.
- Period - How often? Options are Daily, Weekly, and Monthly
- Client - Select the client this task is for. Once selected, any preconfigured defaults will auto populate some of the other fields (ie, recipients, etc.)
- Projects - Select the active client project(s) you want this task to run for. Note: You need to select a client for the projects to list.
- Ignore Weekends - Defaults to "Yes". If the task run time falls on a weekend (Saturday or Sunday) then wait to run the task until the following Monday.
- Recipients - Who should receive the status report in their email? One email address per line.
- Email Subject - You can customize the email subject line of the email the recipients receive.
- Email Body - You can customize the email body of the email the recipients receive.
For the email subject and body you can use the following template variables:
{date_today}- Date that the task is being ran. This will change to the date every time it's automatically ran.{project_list}- The list of included projects in the report.
Now simply click the Add Task button and you're all set.
Project Invoicing
The Invoicing Task will automatically submit new invoices to your clients at the interval that you configure. Each automated invoice will include ALL approved hours for the selected Client and Project that have not yet been invoiced. This ensures that delays in approving timesheets and hours will not lead to lost, or "misplaced", time. Should a delay occur, the approved hours will be automatically submitted at the next invoice run. Truly a "set it and forget it" way to handle your invoices.
When creating a new task you need to complete a form with the required details. Here is what's on the form:
- Start Date - When is the first time this task should run.
- Time - What time should this task run.
- Period - How often? Options are Daily, Weekly, and Monthly
- Client - Select the client this task is for. Once selected, any preconfigured defaults will auto populate some of the other fields (ie, recipients, etc.)
- Projects - Select the active client project(s) you want this task to run for. Note: You need to select a client for the projects to list.
- Ignore Weekends - Defaults to "Yes". If the task run time falls on a weekend (Saturday or Sunday) then wait to run the task until the following Monday.
- Invoice Term - The term, in days, that should be used. IE, if your invoicing terms is usually NET 30, then enter 30 here.
- Recipients - Email addresses of who should receive the invoice in their email inbox.
- Submission Email Subject - You can customize your emails by altering the subject line here.
- Submission Email Body - You can customize your invoice email body (message) here.
- Invoice Type - You will have two options here: "Hours Logged" and "Flat Rate". Those are described below.
Hours Logged - This invoice type is for all approved hours that have not previously been invoiced. Hours that are pending approval at the time the task is ran will not be included.
Flat Rate - This allows you to create custom line items for the invoice. The same line items will be used every time it is created. This is useful to create a recurring invoice of the same amount.
If you select Flat Rate type then you will have a new form added at the bottom. Here you can enter invoice line items. The fields are:
- Employee
- Role
- Hours - Number of hours to show for the line item
- Hourly Rate - Rate to charge per hour
Once done click "Add". You will then be able to add as many rows as you'd like. If you want to remove one, simply click the "delete" checkbox that row and it will be removed once saved.
When you're all done with the form(s) simply click the Add Task button and your task will be saved and scheduled to run.
Project Timelog Delivery
The Client Timelog Delivery task will email the selected client all time log entries submitted during the specified period. Timelog entries are entered via timesheets or individual task log entries. This is useful for clients to see detailed information on tasks being performed on their behalf. You can specify the time period for which you want time logs delivered. This makes this reporting as flexible as the needs of your individual clients.
When creating a new task you need to complete a form with the required details. Here is what's on the form:
- Start Date - When is the first time this task should run.
- Time - What time should this task run.
- Period - How often? Options are Daily, Weekly, and Monthly
- Client - Select the client this task is for. Once selected, any preconfigured defaults will auto populate some of the other fields (ie, recipients, etc.)
- Projects - Select the active client project(s) you want this task to run for. Note: You need to select a client for the projects to list.
- Ignore Weekends - Defaults to "Yes". If the task run time falls on a weekend (Saturday or Sunday) then wait to run the task until the following Monday.
- Filter - Select the filter range that you would like to use. For example, selecting 7 days will only include records from the 7 days prior to the day this automatic task is executing.
- Recipients - Email addresses of who should receive the invoice in their email inbox.
When you're all done with the form simply click the Add Task button and your task will be saved and scheduled to run.
Post Comment
The Post Comment task will post a new comment to your organizations discussions area at the date, time and interval you configure. This is useful for automated check-ins or status updates. As we are very big believers in asynchronous communication, this is a task that will help make your typical workflow more fluid and streamlined.
When creating the new task you need to complete the form with the required details. Here's what's on the form:
- Start Date - When is the first time this task should run.
- Time - What time should this task run.
- Period - How often? Options are Daily, Weekly, and Monthly
- Ignore Weekends - Defaults to "Yes". If the task run time falls on a weekend (Saturday or Sunday) then wait to run the task until the following Monday.
- Post Title - The title of the automated posting. You may use the template variables described below in this field.
- Post Comment - The contents of the actual post. You may use the template variables described below in this field.
- Post Category - You have the option to place this post into a selected category.
- Post Tags - Tag people, teams, projects and clients here.
- Is Private - If this post is marked as private then you are required to place at least 1 tag. Only those tagged will be able to see and participate in the posting.
- Allow Guests - If you want to allow guest / client accounts to participate on this automated posting then check this box.
- Posted By - This will be the user who is used when posting this comment. By default it's the account of your friendly neighborhood AnyHow robot, however you can also select "Me" to run as the user who is creating the automatic post.
For the title and comment fields you can use the following template variables:
{yyyy}- Current year, displayed in 4 digits (ie, 2020), at the time the task is being run.{yy}- Current year, displayed in 2 digits (ie, 20), at the time the task is being run.{mm}- Current month, displayed in 2 digits (ie, 04), at the time the task is being run.{dd}- Current dat, displayed in 2 digits (ie, 04), at the time the task is being run.
Now simply click the Add Task button and you're all set.